Remote Access in Tally ERP 9 Accounting Software
The user in order to access Tally.ERP 9 accounting software remotely needs to perform the following steps:
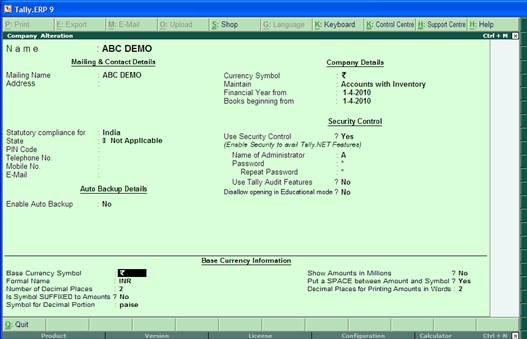
Create Tally.NET User Authorize Tally.NET User Connect Company to Tally.NET Remote Login The following are the steps in detail:- Ensure that the Security Control is enabled in the Company Creation /Alteration screen.
[wp_ad_camp_2]
The user in order to access Tally ERP 9 accounting software remotely needs to perform the following steps:
Create Tally.NET User
Authorize Tally.NET User
Connect Company to Tally.NET
Remote Login
The following are the steps in detail:
Ensure that the Security Control is enabled in the Company Creation/Alteration screen.
Step: 1 – Create Tally.NET User (Remote User)
From Gateway of Tally or Company Info screen press Ctrl+K
Login As Remote Tally.NET User window appears
Enter the account administrator E-Mail ID and Password to login. To the Control Centre
The Control Centre screen appears

Enter on user management option, screen as shown below.

Select the required Security Level from the Security Level displayed.
Enter the E-Mail ID of the user to whom remote access is required
Set the option Tally.Net user to yes
By default, the Status is set to active
Note: You can set the Status to In-active for the existing users
Only one active Tally.NET is allowed for Single User edition and a Maximum of ten active
Tally.NET users are allowed for a Multi User edition (Registered mail id as Owner and the other users as Standard Users in the security level).
Step: 2 – Authorize Tally.NET User
Go to Gateway of Tally > press Alt+F3 > Security Control > Users and Passwords
The List of Users for Company screen appears:
Enter the E-Mail ID of the user
Set Yes to Allow Remote Access
By default, Allow Local TDLs is set to No. Based on the requirement, set this option to Yes
to allow the remote user to access/use local TDLs, if any.
By default, Allow SMS Access is set to No. Based on the requirement, set this option to
Yes to allow the remote user to use SMS access, if any.

Again from security control screen enter on types of security
Enter Tally net user > name of security level Tally net user > use basic facilities of Tally net user
Allow to connect company > YES
Use Tally net authentication > YES
Press Ctrl+A for accepting the screen
Again press Ctrl+A for accepting the Security levels for company screen.

Step: 3 – Connect Company to Tally.NET
Go to Gateway of Tally > Press F4 or click F4: Connect

On successful connection, a Message Company connected successfully is displayed in
The Calculator panel as shown.

Step: 4 – Remote Login
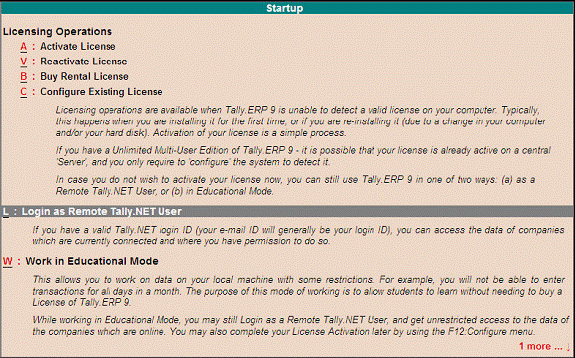
Scenario 1: Educational mode
Start Tally.ERP 9 at the remote location, The Startup screen appears
Select Login as Remote Tally.NET User
Step: 4 – Remote Login
Scenario 1: Educational mode
Start Tally.ERP 9 at the remote location, The Startup screen appears
Select Login as Remote Tally.NET User

Note: In case the company is pre-loaded during startup, click F1: Shut Company, select
Login as Remote User from the Company Info menu
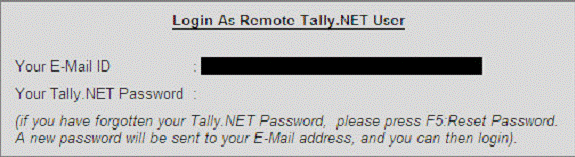
The Login As Remote Tally.NET User screen appears:
o Enter your E-Mail ID in the Your E-Mail ID field.
o Enter the password in Your Tally.NET Password field

Press Enter
The Select Remote Company screen appears displaying the list of remote companies
Available for remote user

[Note: The companies authorized for the Tally.NET user, but not connected to Tally.NET are
Displayed under Offline Companies]
Select the required company from the List of Remote Companies
Press Enter
The selected company is available to the remote user for access or audit depending on the
Type of license
The Gateway of Tally screen displays My Remote ID and My Remote Login Time under
Remote User Details. The Remote Serial number is displayed under the license block of the information panel.

Now you can enter and alter the data remotely.
[wp_ad_camp_1]